Wednesday, September 12, 2018


Hi,

Let's start with the tomato sauce.
Buy one large can of San Marzano or similar tomatoes. 28 oz  {800gr}.
Add 10 leaves of basil

Add 1/4 chopped US onion  or
1/2 chopped normal onion or
1 Shallot

Add 1 tbps sugar, salt per taste and pepper.

Cook for 20, grind it
put it back in the pot and cook for 40.
Add water as needed to keep it saucy and not thick.

You can make the sauce in advance.


The cooking....  This should take around 30-40 minutes.
1/2 cup grits  {mine were White stone ground but any will do, since they don't sell Grits there. You can ask for Polenta, they might carry that}.

2 cups water.
1 cup water spare.

Mix the 2 cups water with the grits
and cook on low heat.
After 20 minutes mix it to avoid sticking and taste.
If it is too coarse add more water and keep cooking.

When it is ready turn off. Leave the lid on.
Throw in 1 tbsp of butter and 50 gr of cheddar.
Don't mix, just leave the lid on and make sure you remembered to remove it from the fire.


For the dish itself.
Take one spicy sausage,
In my case Aduille which is pre-smoked.
Chop to small parts.
Fry on an oil {I used butter}.
After 20 seconds throw some chopepd garlic  {for 2 people 1 garlic clove prevents issues}.
After 20 seconds throw some chopped parsley to stop the garlic fromo browning..   {1/4 cup chopped}
At this stage you want to add an onion, either fine diced onion or shallot or I just use green onion since I grow it in the garden.    Maybe 1/4 cup no more.
2 more minutes
and you can throw the  white fish of your choice chopped into squares.
1 more minute to get some color.

Then you add the tomato sauce you made, just enough to make a sauce, roughly 1/2 cup for 2 people.
Cook 1 minute
Then throw in the diced okra.
cook till the fish is done , this is usually 3-4 minutes.

Adjust the sauce by adding water if needed so you have a nice thick but saucy.

Remove from heat.


Open the Grits, mix the cheese and butter in and mix mix a few times.
Then put the grits on the plate and lay the dish over it
or do 1/2 plate grits and 1/2 plate sauce so the person can mix for themselves.

Saar

Monday, December 16, 2013

Home-made beer and Pasta.


So,
I was crossfitting around to burn some of my cooking and I talked to one of my instructors.
A nice guy named Patrick, he was talking about making beer at home and how easy it is.
http://sanfranciscocrossfit.com/staff/patrick-griffin/
I figured I would give it a try as Pat was no chemist and he said it was like baking bread.

So I went with a kit by Brooklyn BrewShop.


The kit is basically like a  bake a cake mix, you just add water.
Well not that easy but the kit comes with the items above.
A glass bottle, siphon, yeast, beer mix, hops, cleaning stuff, air vent, thermostat.
I also bought the Funnel they sell to reach the free shipping
Funnel with Screen

At a later stage I noticed I need something to bottle the beer into.
For that I just drank 2 six packs of Anchor Steam Lager.

and some
Scrimshaw


Then I bought a bottle capper and caps.
For this I used a company called north brewer
http://www.northernbrewer.com/shop/brewing/brewing-equipment/bottling/bottle-cappers
They are bigger and make more products.
You'll need them once you get tired of using the "pre-mix" and want to experiment making beer
from scratch.

Well anyway.
To the beer.
Making beer.

Basically the kit comes with great instructions.
So I won't repeat them.
But in general this is like making oatmeal.
You add water, then watch the temperature.

The key here though is having 2 big pots.
I had one, so I juggled it but two big pots would be great.

Once you are done you leave it to ferment.


after two weeks you add some honey bottle it and cap it.


Two weeks later.
You are all set.
I opened one and it had the nice beer head, it was nice and light like I like it.
{I don't like hoppy beers}


So that was a success. When i finish chugging them.
I'll try a recipe from scratch.
Wish me luck.


For the pasta.
The recipe is called Spinach Codette with sausage and peas.
Basically you make Spinach Pasta dough.
Pick any recipe.
Then you roll out to thin long sticks the pasta and cut it.
The thinner the better, they should be as thin as skinny string beans.
Then you cook that pasta for 40 minutes.

For the rest, simply remove the casing of a sausage, I used sweet breakfast one.
Then I browned that for 5 minutes. Threw in some green snap peas {I didn't have any peas}
added a little tomato sauce {2 tbsp}  and threw in the Codettes.

The recipe is from the glorious pasta of Italy.


Enjoy buying it.
I tried the recipes for two pastas and they were great.
So i might get it too, I got my copy from the public library where there are always random cook books
for your to try without paying upfront.


Anyway,
Ciao and enjoy.


Tuesday, October 29, 2013

Smothered Collard Greens

Jeez,
You always hear people complaining about having to eat their greens.
My wife did that, I called and said I got Collard Greens and she said those don't taste like much.
Anyway, I showed her.


This recipe is courtesy of Real Cajun, rustic home cooking from Donald Links Louisiana.
This guy own Cochon in New Orleans, well I never heard of it.

The recipe does work.

let's get started.
Get 2 Bunches of Collards, they should be fresh looking and not wilted, you can pick a leaf and
stick it in your mouth, it should have crunch....
2 bacon strips, chop them crosswise

1 small onion chopped, I used Shallot as they are tastier in my opinion.
1 garlic clove, large
1 teaspoons salt
2 teaspoons sugar
1/2 teaspoon of pepper
hot sauce optional
half a chili chopped very fine, if you do a good job it will melt into the sauce
1/6 cup of vinegar,  he said cider, I had wine.
1 cup of chicken broth  or vegetarian broth or water .


So let's start.
Strip the stems from the Collards, you can throw the stems.
Tear the leaves to smaller parts.
Wash them in water to remove the sand, repeat again with clean water.

Heat up a dutch oven.
I just used my cast iron frying pan.

I used medium heat.
Add the bacon and let it get underway, around 5 minutes.
Then at the stage before it browns you can add the onion, garlic and chili
Keep frying for another 4
Add the salt, pepper, sugar mix another 2 minutes.
Add the vinegar and mix, lower the heat to low.
We will let the dish simmer for 5 minutes, every minute give it a mix.

At this stage add all the greens, stir them around and add the cup of stock/water.
Now you can put the lid and leave it for 30 minutes.
After 30 minutes, mix it and check the water, you should always have a little water.
Make sure it doesn't go dry but don't drown them.

Once the rest of your main is ready.
Simply fire it up to the highest heat, remove the lid and mix till they become a little less soggy.
Some people like them dry, I like a little liquid.


There you are, delicious greens.
I mean they were way tastier than the fried chicken breast.
I think I should have called them the MAIN.

Oh, he said pour hot sauce if you want them hotter,
I was fine with my half chili I added.


Sunday, October 20, 2013

Corn SpoonBread

OK.


I guess back in the south they sure do like their corn.
I have no idea, we barely get much corn in the middle-east.
Still, when in Rome {georgia, USA}   do as the Romans do.


So.

Take 3 thick slices of bacon and fry them on low heat till they are browned.
Then flip them, then a few more minutes. When you are done leave them on paper
towels, they will harden up and you will be able to chop them into bacon bits.
{6-10 minutes}

Take a non-stick pot, I use non-stick as it helps avoid loss of stuff due to it sticking.
If you use a regular one, then oil the sides with some fat before starting.
Take 2 cups of milk and start boiling them, add 1.5 tsp of salt and 0.5 tsp of pepper.
Make sure it doesn't boil, it needs to be nice and warm with a bubble popping every 10 second.
You should be able to stick your finger in without it burning you.
Mix 1 cup of  cornmeal,  {cornmeal is rough ground corn, you can get it in WholeFoods itself or you can try
http://www.bobsredmill.com/coarse-grind-cornmeal.html  if you need to order it online.
Bob's OK, their website had some malware a while back but it's now back in form and catering to us folk.
So, don't add the cup all at once, add 1/8 of a cup at a time, then mix it, then a minute later add another 1/8 of a cup, this way you won't have chunks.
When you are done adding it, keep mixing for another 2 minutes. Then remove it from the heat.
Add 4 table spoons of fat, it can be butter. I just recycle the bacon fat from the frying pan.

Take 1 cup of cheddar and add it, I suggest you use a block of cheddar, the reason is that they will coat the "ground" cheddar with wax to keep it from spoiling. So if you get a block there is no wax.
Take 3 green onions and chop the white parts from them and add them.
Take 1 cup of corn kernels and add them. I use fresh corn, you can buy in wholefoods
and simply run the knife along the corn husk to remove the corn kernels.
Take 1 chili, I used Guajillo which is pretty mild


If you use a "hotter" one I'd recommend just chopping it finer or if your
chopping skills are not that good, just use a grater.

So we are almost there.
Now take 1 cup of room temperature milk.
Take 3 eggs that are room temperature and separate the yolk from the eggs white
add the yolk to the milk, mix them to a nice consistency. Then add them to the mixture we have.

Now, this is the KEY of the whole dish.
You need to whisk the egg whites.
This is NOT easy, if the egg whites are too cold it won't go up.
If you use plastic, it tends to be very difficult to go up.
So I recommend you invest in a copper bowl.
Copper causes a chemical reaction that makes the egg whites become well whipped.
If you try whisking 1.5 egg whites it won't work either. You need more egg white material for it to work
so don't try to "half" this recipe.
Anyway once you whisk for a few minutes you should get some nice consistency.
The consistency should have a structure and should be able to maintain a little weight.
This is KEY to the fluffiness of the dish.

Mix 1/8 of the egg whites into the mixture
Then slowly another 1/8.
Now DON"T mix, use an up and down motion, reach down to the bottom and scoop some stuff
then go up and pour it over the top and repeat. Don't do a boring circular motion as it breaks up the white egg structure.
When you are done.

Take it all and put it in serving dishes.


This is one example courtesy of
http://smittenkitchen.com/blog/2010/11/sweet-corn-spoonbread/


I just used my Frying pan


My Swiss(tm) frying pan is non-stick and can go in the oven.
I also used the same pan to cook the bacon so it was nicely oiled already.
So I scooped the mixture on the pan.
Then put it in the oven.

I did 20 minutes at 350F .
I would recommend you test after 15 minutes every 2 minutes. It makes for a less pleasnt presentation
but it should give you a measure.
The goal is for it to NOT be dry but not be too watery.
This is supposed to be bread you eat with a spoon.

When you are done scoop it to plates and let your guests drizzle honey on it or mapel.
The sweet honey mixes well with the savory cornbread.


I'd like to thank Rick Rodgers   "breakfast comforts" and the SF library for the recipe.

Monday, July 29, 2013

Baking bread the easy way

Bread.....

This is my lunch dish for today/
A nice whole wheat bread, some cream cheese and cured salmon.


Today,
we can start with the bread.
The quantities are for 2 - 4 people. Personally I split it into two parts have one part the same day
the other part goes in the fridge and I either make it the next day or use it for pizza.

So.
1.5 teaspoons of dry yeast
1 cup of warm water - simply slightly hot water on your hand it should not burn you just
feel nice and warm, then reach the 1 cup.
1 table spoon of honey.

That is it.
Take all three and mix them in a bowl.


After 10 minutes they will bubble


If they don't bubble, that means they are faulty or your water is too cold.
Test to see the water is warmish and add a little sugar.
If you wait another 10 minutes and nothing happens throw it out and get another manufacturer.
My "red" yeast failed, so I just bought Fleischman which works fine.
I also made my own, but that is another blog.

So the yeast is bubbling.
Add
1 teaspoon of salt
1 tablespoon of oil
1 tablespoon of wheat germ - if you don't have this, you can skip it.
1 cup of whole wheat flour - if you don't have any just use regular wheat.
1/4 of a cup of milk - if you don't have it just use water

So

the above are what you add.


mixy mix 200 times.
See how it has a nice consistency.
Now just add flour 1/2 cup at a time.
As you can see slowly
it becomes more solid

add another 1/2 cup

It will slowly get to be harder to move
your wood spatula or spoon around and the dough will slowly stop clinging to the bowl.
however it can be draining on the arm.
So simply leave it for a few minutes and then get back to it.
So, the more you mix at this stage the less you have to knead.
Anyway a little more flour and it should come off.
simply flour a board.
Put some flour on the bread and start kneading.
I can't photograph and knead at the same time.
This is a nice video.
https://www.youtube.com/watch?v=n7jBrDWJOds
I use the third one mainly, the first is too noisy.
the dough should be sticky but not stick if it sticks add a little flour.
Keep going, if you get tired take a break, when you come back it will have blown up slightly because
of the yeast working.
Okay, after 10-15 minutes stop.
Stick your finger in the dough and when you take it out the dough should puff slowly back up to fill the hole.
If it is pretty quick you should be set or just count the 15 minutes.

Now.


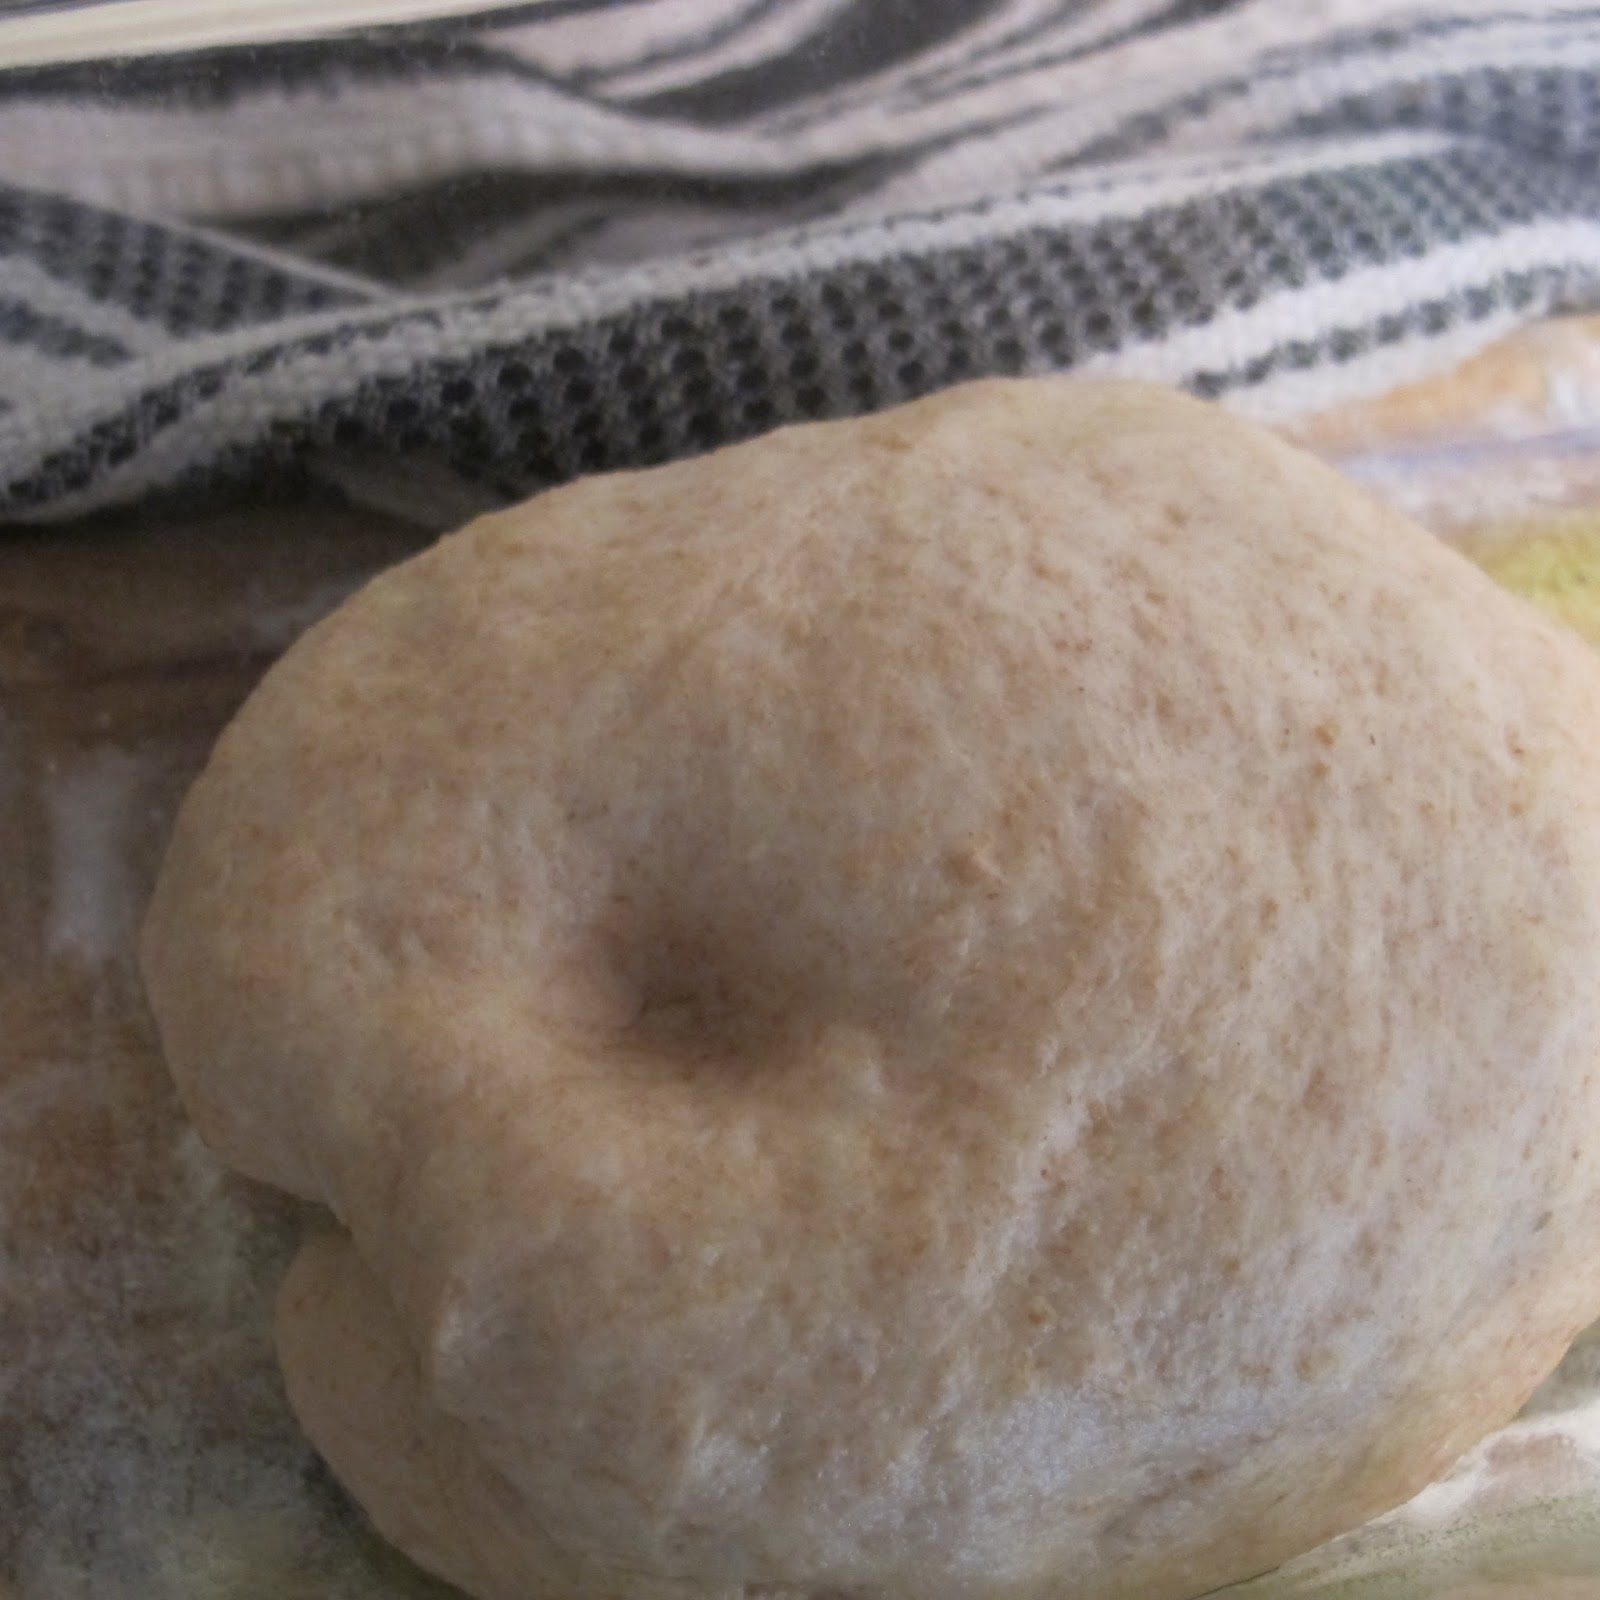
This is how the dough started, 5 inches across.
I just threw some flour on the top and covered it with a rag.

If you don't flour the top, the rag will stick. So flour it nicely.

The dough will expand slowly.
1 hour - 2 hours it all depends on how warm it is.
If your house is freezing cold and you live in novosibirsk, then simply place it closer to a source of heat.
If your house is as hot as hades because you live in Israel and can't afford the AC, then put it in your coolest
spot.
Anyway,.
After X time  1-2 hours, you can peek.


Notice the lovely expansion.
from 2-10 inches  see 8 inches now.


Okay, punch it down.
Yes all the air will go out.


after that leave it again for 1 hour.


After the second rise you can punch it down again and shape it into the shape you want


In my case I wanted a loaf.
You can use a pyrex like I did.
If you use a Pyrex you can look at the dough on the bottom and see it expanding.
Anyway,

So first rise was 1-2 hours
second rise was 1 hour
third rise is 30 minutes.
The reason is that by now the yeast have improved their game and are more efficient.
Once the 30 minutes elapse you can throw it in the oven.

You can also check manually,

Stick your clean finger in the dough, it should make a hole
when you remove your finger the hole won't fill in. {this is the opposite of the kneading where we wanted it to fill in}
The reason is that by now the structure of the dough is such that there are a lot of air pockets.
So the structure is brittle.
If you leave it now for 10 minutes it will start filling up. As opposed to 1-2 minutes when we were kneading.


That is it, heat up the oven to 375F and chuck it in.


I forgot to take a foto
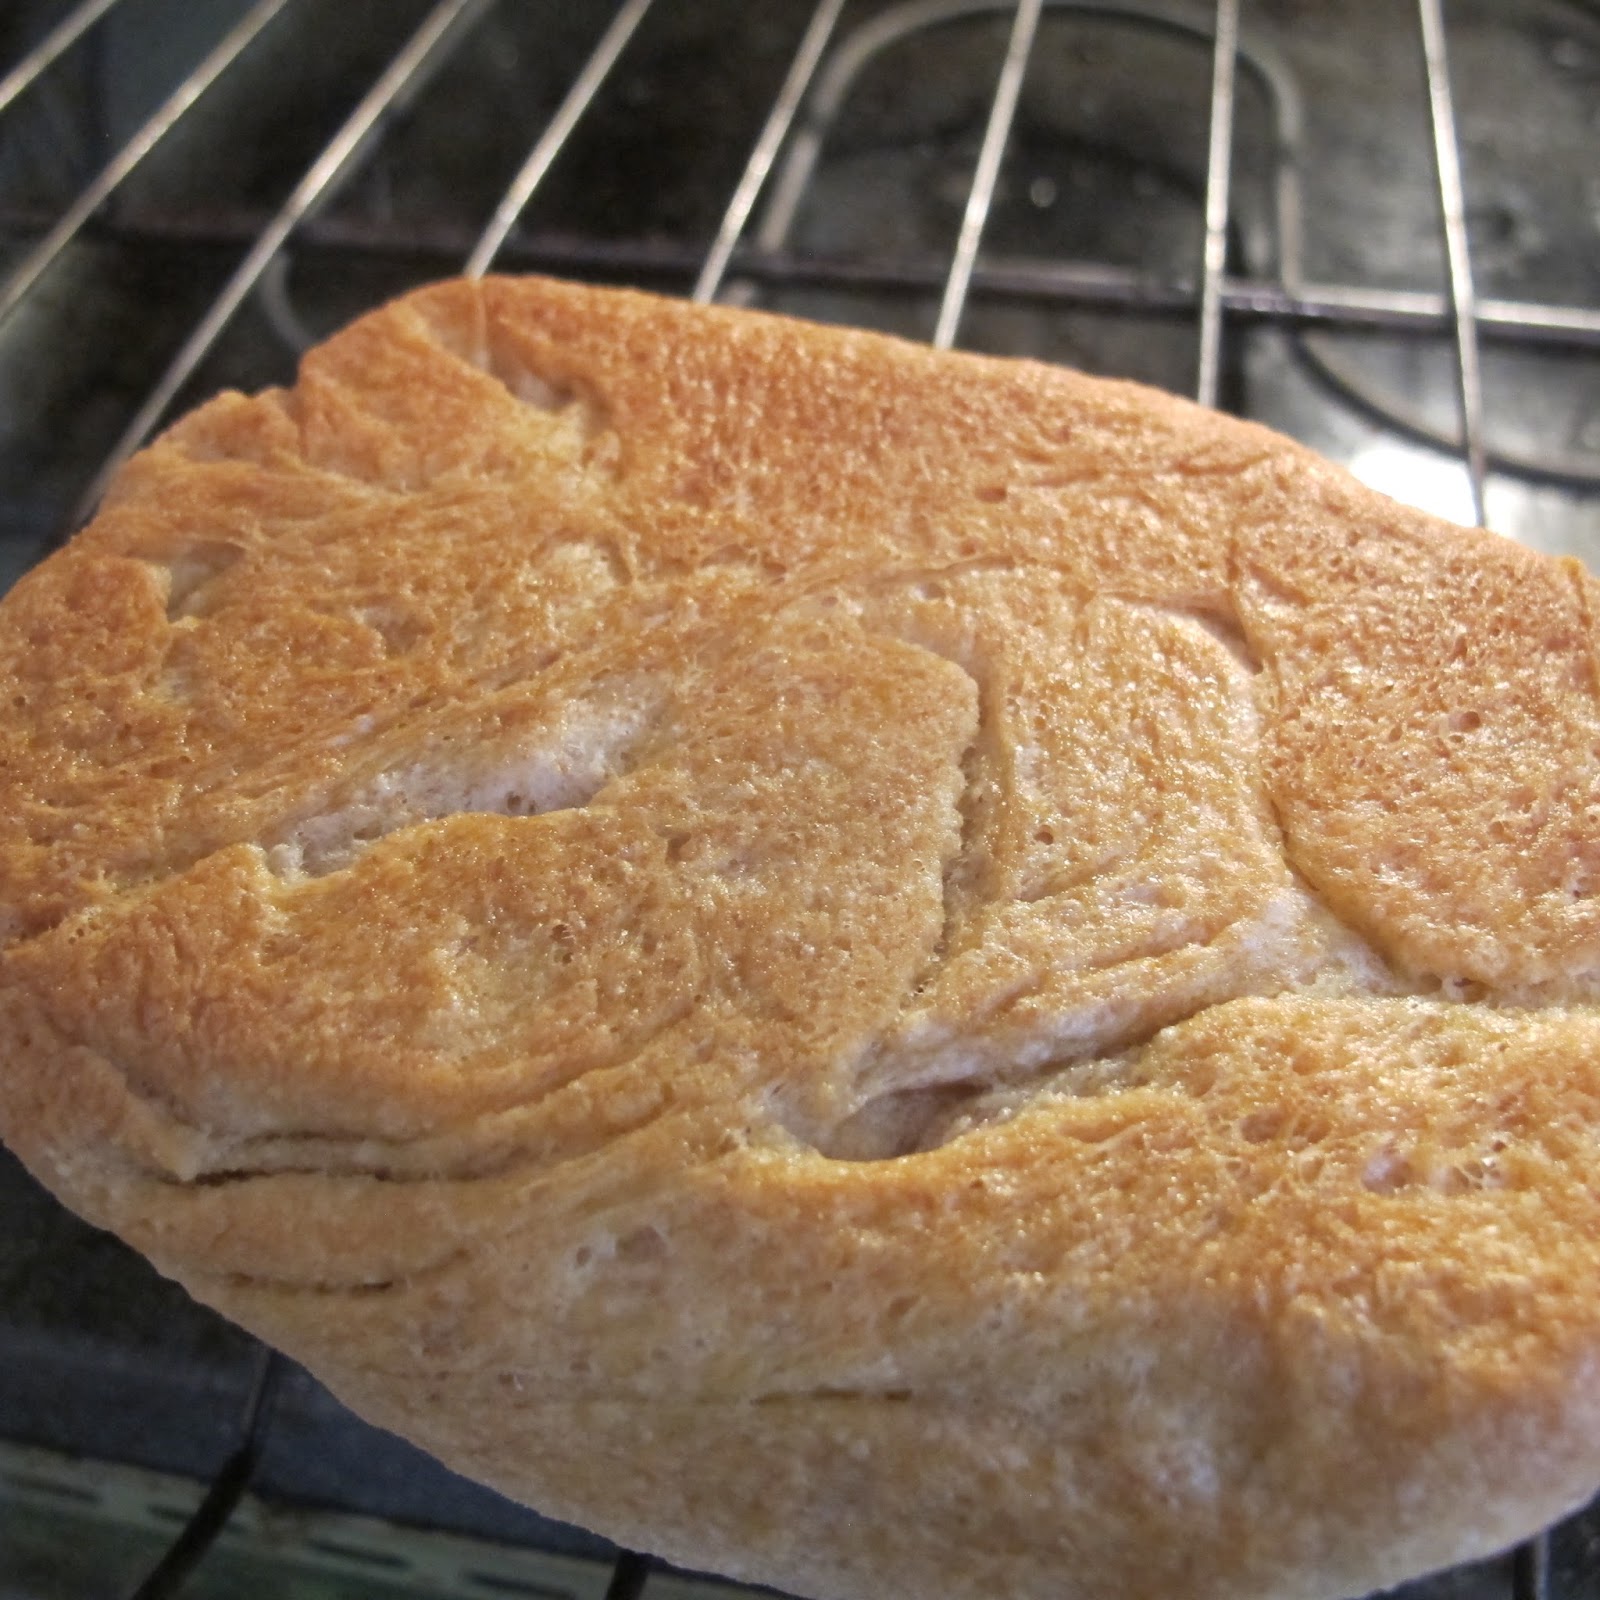
Anyway after 25 minutes flip the bread from the pan so you can color the other side.
In my case my heat is from the bottom, so this gives the top a deeper color.

Now, how do you know if it needs 20 minutes or 25 minutes or 30 minutes.
Well, once you flipped it you can tap the bread like a drum.
If it make a heavy sound, it is moist and not ready.
The more it dries up in the middle, the better the percussion sound will be and it will sound
more hollow.
You can make the recipe 4 times, one time stop after 20 , drum it for the sound and then open it.
See how the sound tells you if it is ready.
The second time do 25 minutes
the third 30 minutes etc.
This way you learn.

After you think the bread is ready, either take it out and wolf it down
or give it 10 minutes to rest nicely.


Anyway, that's it.
I also made myself some nice cured wild salmon and bought some cowgirl cream cheese.
Notice the bread is slightly dark, that is because I used the whole wheat
which like I said is optional.
Try to use 50% whole wheat and 50% regular flour. Don't try making the whole thing whole
wheat as whole wheat is slow to rise and not as "user" friendly.


Anyway,
Good luck and let me know if you have any questions.


Wednesday, January 30, 2013

Braised Oxtal with Anise Star

Ingredients
1 Oxtail   3 lb or so
1 red onion
3 garlic cloves
2 cups red wine
4  star anise stars
1-2  bay leaves
8 prunes
beef stock if you want I just used water so I would have the Oxtail taste.
2 clementines
Curly parsley for decoration


Delicious.

I bought a whole Oxtail.


Simply chop it to fit the dutch oven pot or what ever you are using.
There are joints between the bones, you can go for those or simply hack with the butcher's axe.
If you must, just ask the butcher to cut it to smaller parts.
I go with less parts so it is easier to debone at the end.

Fry it in 1 tbsp of oil for 8 minutes till you get some nice color.


Alright
After 8 minutes remove it and place it to the side.
Add the chopped onion.

the garlic and a little of the parsley.


cook for 3 minutes till you get a sear.
Then pour in the wine
Add the star anise , the prunes and the bay leaves.


Add water to cover the most of the meat.
Then place in the oven for 3.5 hours at 300 F.

When you are done, you should be able to easily de-bone the meat using a pair of forks.
Remove the bay leaves, the anise stars, chunks of fat and if you have any gristle.

So, the liquid level can be changed by how you like your sauce.

This is the pasta I used, Pappardelle.

I also added the clementine or blood orange, I removed the seeds etc and it was  added then cooked for only 2-3 minutes to keep their partial shape.


Well this is the results, it is a little sweet for meat and delicious.
But don't take my word, try it yourself.


Tuesday, January 29, 2013

Lamb Breast

Lamb Breast.


So let's describe it.
This cut is
Skin
Fat
Meat
Fat
meat
Bone
The fat content on this piece of meat is very high. So take into account you will need to hit the gym
afterwards.

It takes 3 hours or so to cook it and I got it 90% right on the first time.
Here is the link to the video.
http://www.youtube.com/watch?v=NpqrwDZEwqY

It's probably one of the better video explanations I have seen.
Watch and learn.

Enjoy the cut.